Cómo Hacer la Plancha: Guía de Forma, Músculos y Variantes
Por qué la plancha es el mejor ejercicio de core

La plancha es engañosamente simple: mantén tu cuerpo en una línea recta, apoyado sobre los antebrazos y los dedos de los pies. Pero esa única posición entrena todo tu core — frontal, lateral y posterior — de una forma que los crunches y los abdominales nunca pueden.
Un estudio de 2016 publicado en el International Journal of Sports Physical Therapy comparó la activación muscular del core en múltiples ejercicios y encontró que la plancha produjo una de las mayores activaciones del transverso del abdomen — el músculo profundo que actúa como un corsé interno. Esto es importante porque el transverso del abdomen es el músculo más responsable de la estabilidad espinal, y es prácticamente ignorado por ejercicios de flexión como los abdominales.
Músculos trabajados
La plancha es una sujeción isométrica de todo el core:
- Principales: Recto abdominal (abdominales frontales), transverso del abdomen (estabilizador profundo del core), erectores espinales (zona lumbar)
- Estabilizadores: Oblicuos internos y externos (estabilidad lateral del tronco), serrátil anterior (control de la escápula), glúteo mayor (evita el descenso de la cadera)
- Secundarios: Cuádriceps (mantienen las piernas rectas), deltoides (sostienen la posición del hombro), romboides (retraen las escápulas)
Tu core no es solo los abdominales — es un cilindro de 360 grados que envuelve tu columna. La plancha entrena todo este cilindro como una unidad integrada, que es exactamente como funciona en la vida diaria y en el deporte.
¿Cómo hacer la plancha con la técnica adecuada?

Una buena plancha se trata de posición y tensión, no de tiempo. Así es como se configura:
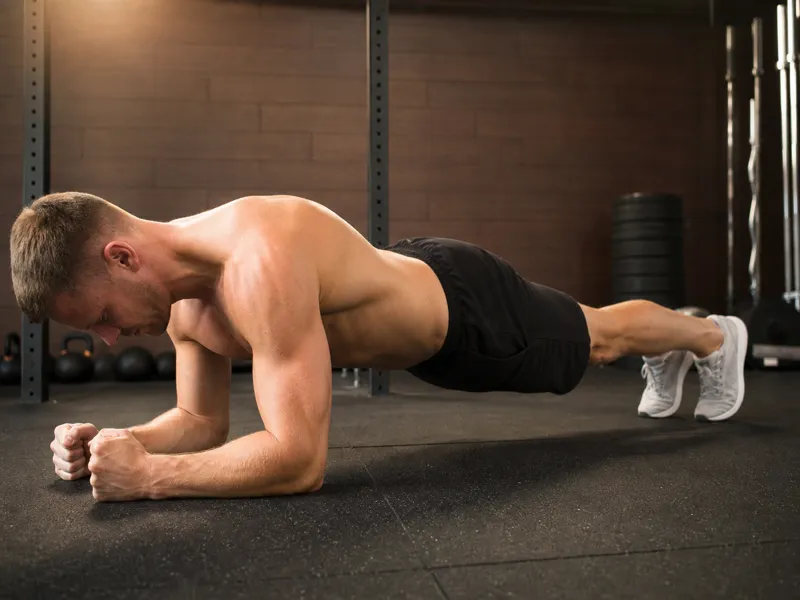
Paso 1 — Posición de codos: Comienza a cuatro patas y baja sobre tus antebrazos. Coloca los codos directamente debajo de los hombros — ni muy adelante ni muy atrás. Tus antebrazos deben ser paralelos entre sí, con los dedos extendidos en el suelo. Piensa en crear un trípode estable: dos codos y el borde de las manos.
Paso 2 — Extiende y alinea: Retrocede un pie a la vez hasta que tu cuerpo forme una línea recta desde la coronilla hasta los talones. Los pies deben estar a la anchura de las caderas o ligeramente más juntos — pies más anchos facilitan la plancha, más estrechos la dificultan.
Paso 3 — Activa: Aprieta los glúteos con fuerza. Contrae el abdomen como si alguien fuera a empujarte. Baja y junta ligeramente las escápulas — esto activa los dorsales y evita que la espalda alta se redondee. Mete ligeramente la barbilla para mantener el cuello neutro (mira al suelo entre las manos, no hacia adelante).
Paso 4 — Mantén la tensión: Mantén la tensión de todo el cuerpo durante toda la ejecución. Tu cuerpo debe verse como una tabla rígida — si alguien te empuja desde un lado, no deberías tambalearte. Respira de forma constante por la nariz; no contengas la respiración. Si tu forma comienza a fallar (caderas caídas, espalda baja arqueada), termina la serie inmediatamente.
La National Strength and Conditioning Association (NSCA) recomienda enfocarse en la calidad de la forma en lugar de la duración. Una plancha de 20 segundos con alineación perfecta y tensión completa desarrolla más fuerza funcional del core que una plancha de 2 minutos con la espalda baja hundida.
¿Cuáles son las mejores variantes de plancha para todos los niveles?
Si solo puedes hacer una variante de plancha, que sea la plancha estándar sobre antebrazos. Pero una vez que puedas mantenerla durante 45–60 segundos con forma limpia, necesitas variantes más difíciles para seguir progresando — porque simplemente mantener más tiempo no es la mejor forma de desarrollar fuerza.
| Variante | Dificultad | Enfoque principal | Para quién |
|---|---|---|---|
| Plancha de rodillas | Principiante | Activación del core | No puede mantener 20s estándar |
| Plancha inclinada | Principiante | Alineación corporal completa | Progresión desde rodillas |
| Plancha estándar sobre antebrazos | Intermedio | Estabilidad completa del core | Línea base para todos |
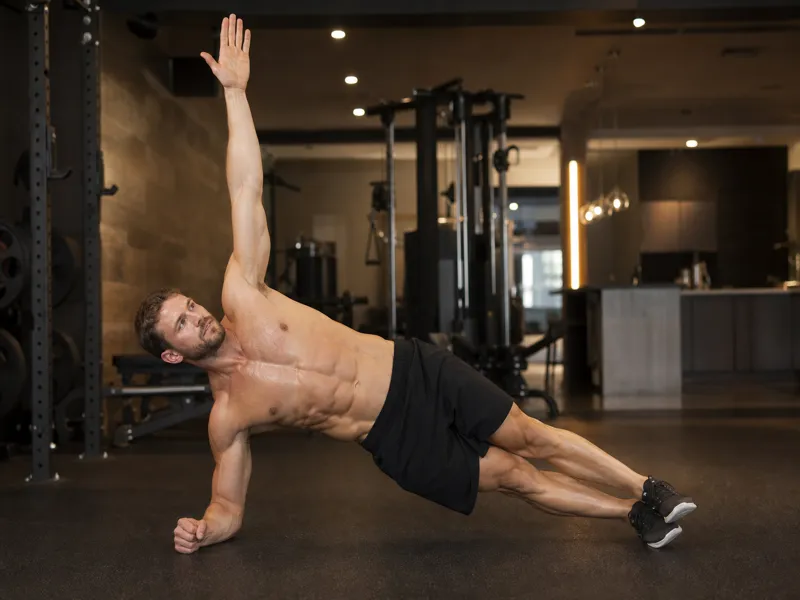
| Plancha lateral | Intermedio | Oblicuos + estabilizadores de cadera | Entrenamiento equilibrado del core |
| Plancha con toques de hombro | Avanzado | Anti-rotación | Control del core en movimiento |
Estrategia de progresión: Domina cada variante con 3 series de 30–45 segundos antes de subir de nivel. El salto de plancha de rodillas a plancha completa es donde la mayoría de los principiantes se quedan atascados — las planchas inclinadas (antebrazos sobre un banco) son el mejor puente porque entrenan la alineación corporal de la plancha estándar con menos peso sobre el core.
Las planchas laterales merecen un lugar permanente en tu rutina porque entrenan los oblicuos y los abductores de cadera que la plancha estándar trabaja poco. En mi experiencia, las personas que omiten las planchas laterales desarrollan un core frontal fuerte pero una estabilidad lateral débil — lo que se manifiesta como caída de cadera al correr y mal equilibrio en ejercicios unipodales.
¿Cuáles son los errores más comunes en la plancha?
La plancha parece fácil, lo que significa que la mayoría de las personas nunca reciben correcciones en su forma. Estos cinco errores son la razón por la que tu plancha se siente fácil pero tu espalda baja te duele:
1. Caderas hundidas: El error más común. Cuando tu core se fatiga, las caderas caen hacia el suelo, convirtiendo la plancha en una suspensión pasiva que carga la columna lumbar. Solución: Aprieta los glúteos y piensa en tirar del ombligo hacia arriba, hacia la columna. Si las caderas siguen hundidas, la serie ha terminado — descansa y vuelve a intentarlo.
2. Caderas elevadas: Levantar el trasero al aire facilita la plancha acortando la palanca, pero elimina por completo el desafío del core. Solución: Pide a alguien que coloque un palo de escoba a lo largo de tu espalda — debería tocar tu cabeza, espalda alta y coxis simultáneamente.
3. Contener la respiración: La respiración se detiene cuando la intensidad aumenta. Esto eleva tu presión arterial y reduce el tiempo que puedes mantener la posición. Solución: Practica la respiración nasal durante cada plancha. Si no puedes respirar, la variante es demasiado difícil.
4. Mirar hacia adelante: Extender el cuello para mirar un reloj o un espejo tensiona la columna cervical y suele acompañar la posición de caderas elevadas. Solución: Mantén la mirada en el suelo entre tus antebrazos. Tu cuello debe ser una extensión de tu columna — sin ángulos.
5. Codos demasiado adelantados: Colocar los codos por delante de la cabeza transfiere el peso a los hombros y elimina la participación del core. Solución: Tus codos deben estar directamente debajo de los hombros. Si trazas una línea desde tu hombro al suelo, pasaría por tu codo.
¿Cuáles son los puntos clave?
| Punto | Recomendación |
|---|---|
| Músculos principales | Recto abdominal, transverso del abdomen, erectores espinales |
| Posición de codos | Directamente bajo los hombros — no adelantados |
| Alineación corporal | Línea recta de la cabeza a los talones — sin hundir ni elevar |
| Duración | 20–60 segundos con forma perfecta, luego aumenta la dificultad |
| Progresión | Rodillas → Inclinada → Estándar → Lateral → Toques de hombro |
Lista de comprobación rápida — corrige esto antes de tu próxima plancha:
- Glúteos apretados y core activado antes de iniciar el cronómetro
- Caderas niveladas — ni hundidas ni elevadas
- Codos directamente bajo los hombros
- Cuello neutro — mirada al suelo entre las manos
- Respiración constante — sin contener la respiración
Próximos pasos: Si no puedes mantener una plancha estándar durante 20 segundos, comienza con planchas de rodillas o planchas inclinadas (antebrazos sobre un banco). Progresa hasta 3 series de 30 segundos, luego pasa a la versión estándar. Una vez que puedas mantener 60 segundos, añade planchas laterales y flexiones a tu rutina para un circuito completo de core y tren superior con peso corporal.
Preguntas Frecuentes
¿Qué músculos trabaja la plancha?
Principalmente recto abdominal, transverso del abdomen y erectores espinales. Oblicuos, serrátil anterior, glúteos y cuádriceps actúan como estabilizadores.
¿Cuánto tiempo debo mantener la plancha?
Principiantes: 20-30 segundos con forma perfecta. Construye hasta 60 segundos. Más allá de 60 segundos, cambia a variaciones más difíciles en lugar de aguantar más tiempo.
¿La plancha es mejor que los abdominales?
Para la mayoría, sí. La plancha entrena el core como estabilizador, los abdominales como flexor con flexión repetitiva de columna. La plancha activa más los músculos profundos con menos carga espinal.