Comment Faire la Planche : Guide de Forme, Muscles & Variantes
Why the Plank Is the Best Core Exercise

The plank is deceptively simple: hold your body in a straight line, supported by your forearms and toes. But that single position trains your entire core — front, sides, and back — in a way that crunches and sit-ups never can.
A 2016 study in the International Journal of Sports Physical Therapy compared core muscle activation across multiple exercises and found that the plank produced some of the highest activation in the transverse abdominis — the deep muscle that acts like an internal corset. This matters because the transverse abdominis is the muscle most responsible for spinal stability, and it is largely ignored by flexion-based exercises like sit-ups.
Muscles Worked
The plank is a full-core isometric hold:
- Primary: Rectus abdominis (front abs), transverse abdominis (deep core stabilizer), erector spinae (lower back)
- Stabilizers: Internal and external obliques (side trunk stability), serratus anterior (shoulder blade control), gluteus maximus (prevents hip sag)
- Secondary: Quadriceps (keep legs straight), deltoids (support shoulder position), rhomboids (retract shoulder blades)
Your core is not just your abs — it is a 360-degree cylinder that wraps around your spine. The plank trains this entire cylinder as one integrated unit, which is exactly how it functions in daily life and athletics.
Plank: Step-by-Step Form

A good plank is about positioning and tension, not time. Here is how to set it up:
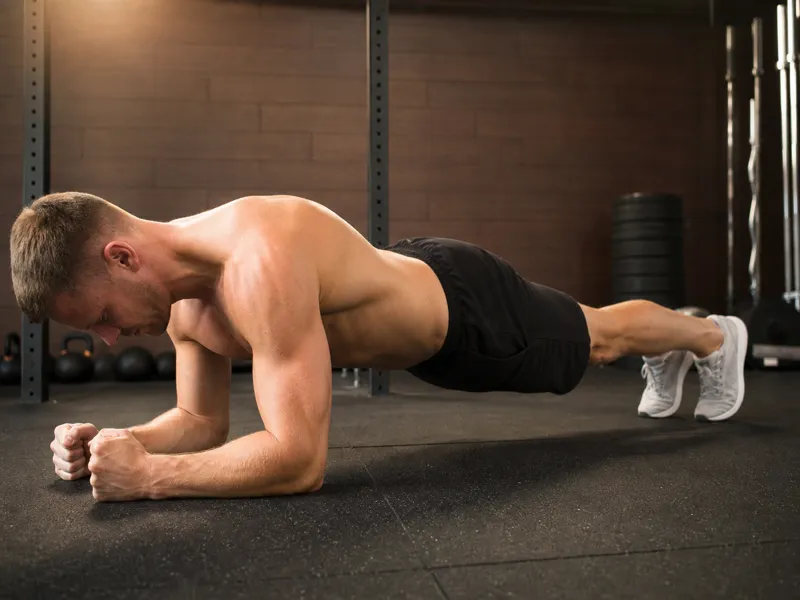
Step 1 — Elbow placement: Start on all fours, then lower onto your forearms. Position your elbows directly under your shoulders — not way out in front, not too far back. Your forearms should be parallel to each other, fingers spread on the floor. Think of creating a stable tripod: two elbows and the edge of your hands.
Step 2 — Extend and align: Step your feet back one at a time until your body forms a straight line from the crown of your head to your heels. Your feet should be hip-width apart or slightly narrower — wider feet make the plank easier, narrower makes it harder.
Step 3 — Brace: Squeeze your glutes hard. Brace your abs as if someone is about to push you over. Pull your shoulder blades down and slightly together — this engages your lats and prevents your upper back from rounding. Tuck your chin slightly so your neck stays neutral (look at the floor between your hands, not ahead).
Step 4 — Hold with tension: Maintain full-body tension for the duration. Your body should look like a rigid board — if someone pushed you from the side, you should not wobble. Breathe steadily through your nose; do not hold your breath. If your form starts to break (hips sag, lower back arches), end the set immediately.
The National Strength and Conditioning Association (NSCA) recommends focusing on form quality rather than duration. A 20-second plank with perfect alignment and full tension builds more functional core strength than a 2-minute plank with a sagging lower back.
Plank Variations for Every Level
If you can only do one plank variation, make it the standard forearm plank. But once you can hold it for 45–60 seconds with clean form, you need harder variations to keep progressing — because simply holding longer is not the best way to build strength.
| Variation | Difficulty | Main Focus | Who It's For |
|---|---|---|---|
| Knee plank | Beginner | Core activation | Can't hold 20s standard |
| Incline plank | Beginner | Full-body alignment | Building up from knees |
| Standard forearm plank | Intermediate | Full core stability | Baseline for everyone |
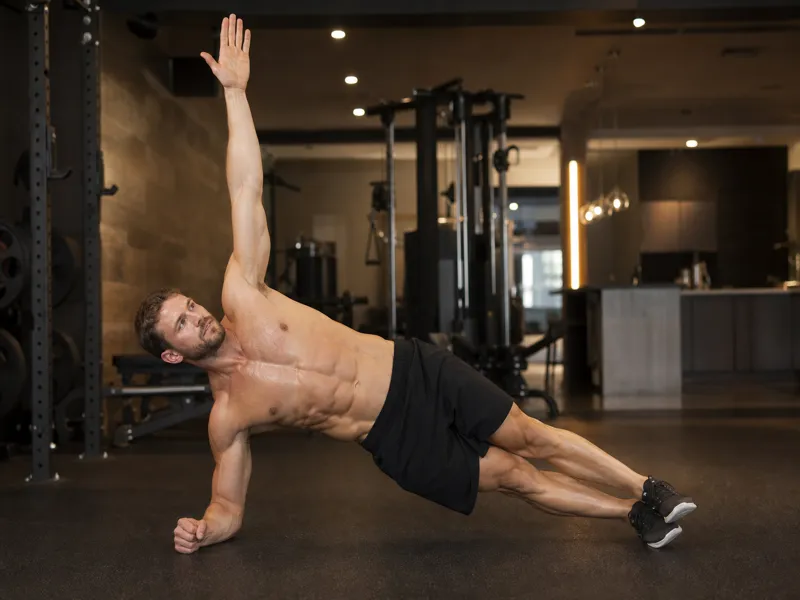
| Side plank | Intermediate | Obliques + hip stabilizers | Balanced core training |
| Shoulder tap plank | Advanced | Anti-rotation | Core control under movement |
Progression strategy: Master each variation for 3 sets of 30–45 seconds before moving up. The jump from knee plank to full plank is where most beginners get stuck — incline planks (forearms on a bench) are the best bridge because they train the full-body alignment of the standard plank with less weight on the core.
Side planks deserve a permanent spot in your routine because they train the obliques and hip abductors that standard planks underwork. In my experience, people who skip side planks develop a strong front core but weak lateral stability — which shows up as hip drop during running and poor balance in single-leg exercises.
Common Plank Mistakes
The plank looks easy, which means most people never get corrected on their form. These five mistakes are the reason your plank feels easy but your lower back feels sore:
1. Sagging hips: The most common error. When your core fatigues, your hips drop toward the floor, turning the plank into a passive hang that loads your lumbar spine. Fix: Squeeze your glutes and think about pulling your belly button up toward your spine. If your hips still sag, the set is over — rest and try again.
2. Piked hips: Sticking your butt up in the air makes the plank easier by shortening the lever, but it completely removes the core challenge. Fix: Have someone place a broomstick along your back — it should touch your head, upper back, and tailbone simultaneously.
3. Holding your breath: Breathing stops when the intensity gets high. This spikes your blood pressure and reduces the time you can hold the position. Fix: Practice nasal breathing during every plank. If you cannot breathe, the variation is too hard.
4. Looking ahead: Craning your neck up to look at a clock or mirror strains the cervical spine and usually accompanies a piked-hip position. Fix: Keep your gaze on the floor between your forearms. Your neck should be an extension of your spine — no kinks.
5. Elbows too far forward: Placing your elbows out in front of your head shifts the weight onto your shoulders and removes core engagement. Fix: Your elbows should be directly under your shoulders. If you drew a line from your shoulder to the floor, it would pass through your elbow.
Key Takeaways
| Point | Recommendation |
|---|---|
| Primary muscles | Rectus abdominis, transverse abdominis, erector spinae |
| Elbow position | Directly under shoulders — not forward |
| Body alignment | Straight line head to heels — no sag, no pike |
| Duration | 20–60 seconds perfect form, then increase difficulty |
| Progression | Knee → Incline → Standard → Side → Shoulder taps |
Quick checklist — fix these before your next plank:
- Glutes squeezed and core braced before starting the timer
- Hips level — neither sagging nor piked
- Elbows directly under shoulders
- Neck neutral — gaze at the floor between hands
- Breathing steadily — not holding breath
Next steps: If you cannot hold a standard plank for 20 seconds, start with knee planks or incline planks (forearms on a bench). Build to 3 sets of 30 seconds, then transition to the standard version. Once you can hold 60 seconds, add side planks and push-ups to your routine for a complete bodyweight core and upper-body circuit.
Questions Fréquentes
Quels muscles travaille la planche ?
Principalement le grand droit, le transverse et les érecteurs du rachis. Obliques, serratus, fessiers et quads stabilisent.
Combien de temps tenir la planche ?
Débutants : 20-30 secondes forme parfaite. Montez à 60 secondes. Au-delà, changez de variante plutôt que tenir plus longtemps.
La planche est-elle meilleure que les crunchs ?
Pour la plupart, oui. La planche entraîne le gainage, les crunchs la flexion répétée. La planche active mieux les muscles profonds avec moins de charge spinale.